Self-host Chatwoot
Website chat, email and API conversations in one inbox you own.
Shelley handles the setup. About 20 minutes.
Prefer a terminal?
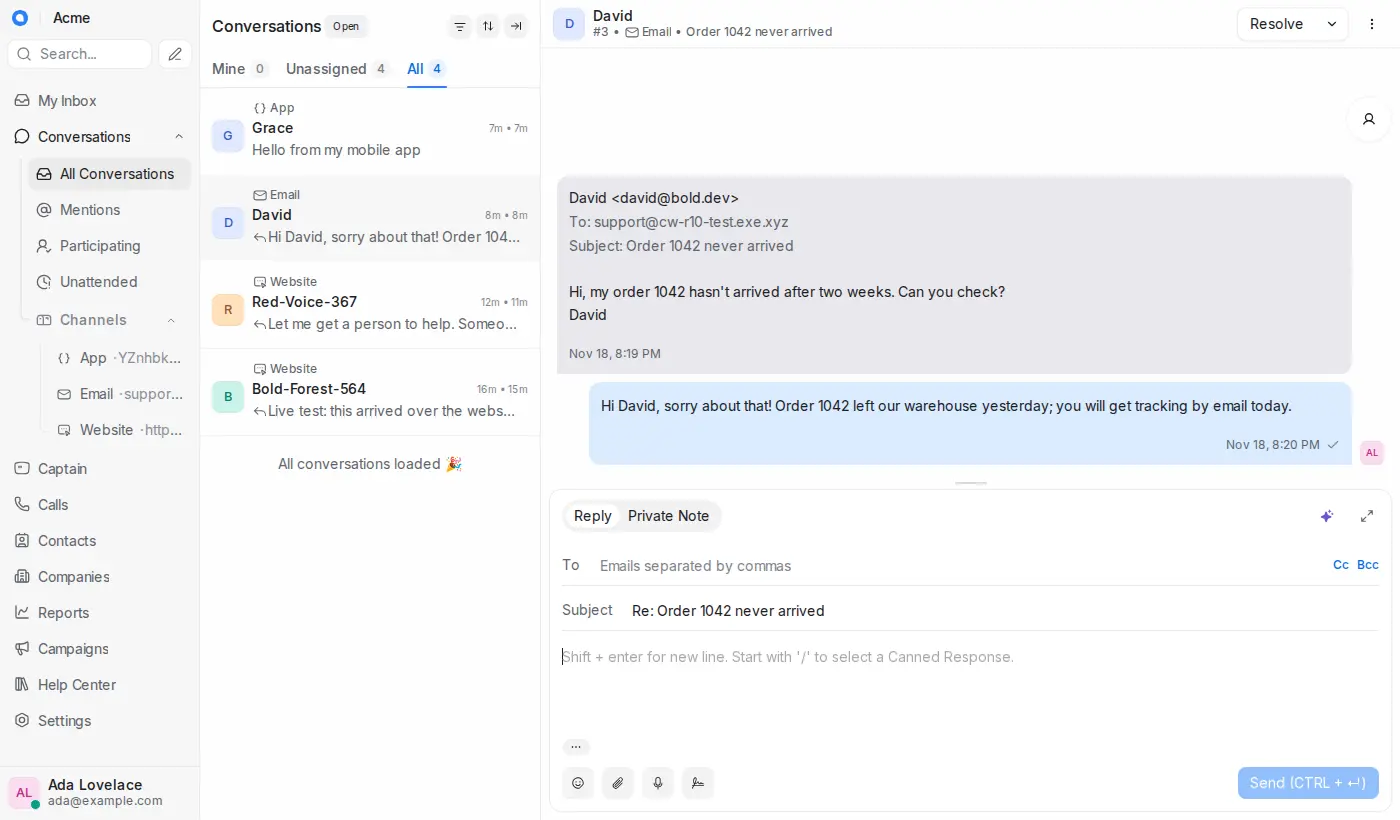
curl -fsSL https://exe-staging.dev/deploy/chatwoot/prompt.txt | ssh exe.dev new --prompt=/dev/stdinChatwoot is an open-source customer support inbox, in the same family as Intercom and Zendesk. A chat bubble on your website, an email address, and your own app's API all land in one shared inbox, where your team replies, assigns, labels and follows up.
On exe.dev it runs on a VM with a real disk, so months of conversations and attachments stay put. The agent dashboard sits behind exe.dev login on a private port; the VM's main address serves only what website visitors need. Email arrives at your VM's own address and replies go out through exe.dev, with no mail provider to sign up for. Chatwoot's AI reply tools use exe.dev's LLM gateway, so there's no API key to paste, and Shelley, the agent on the VM, can read the logs and change the setup for you.
What you get#
- Chatwoot 4.20 on PostgreSQL and Redis, back after a reboot.
- A dashboard only you and the people you share with can open, and a public address that serves the widget and nothing more.
- An email inbox at your VM's address, with replies sent through exe.dev and no mail provider.
- AI reply suggestions, summaries and rewrites through exe.dev's LLM gateway, no API key.
- Nightly backups of the database, uploads and encryption keys, with a test restore.
What's running, and where
https://my-chatwoot.exe.xyz:3000/
The agent dashboard, behind exe.dev login and Chatwoot's own
https://my-chatwoot.exe.xyz/
Chat widget, public APIs and webhooks; make it public to put the widget on your website
Deploy with Shelley#
Click Deploy and Shelley will set up Chatwoot on a new VM, then check that it works. No config-file wrangling required.
Prefer a terminal?
curl -fsSL \
  https://exe-staging.dev/deploy/chatwoot/prompt.txt \
  | ssh exe.dev new --prompt=/dev/stdin
What Shelley is told
Set up Chatwoot on this VM by following the exe.dev recipe at https://exe-staging.dev/deploy/chatwoot.md?via=deploy from top to bottom.

The recipe's example VM name is my-chatwoot. This VM's name is the output of `hostname`: use it wherever the recipe writes my-chatwoot. Skip the step that creates the VM; you are on it.

You are done when all of these are true. Check each one yourself:
- Chatwoot 4.20 on PostgreSQL and Redis, back after a reboot.
- A dashboard only you and the people you share with can open, and a public address that serves the widget and nothing more.
- An email inbox at your VM's address, with replies sent through exe.dev and no mail provider.
- AI reply suggestions, summaries and rewrites through exe.dev's LLM gateway, no API key.
- Nightly backups of the database, uploads and encryption keys, with a test restore.

Read the whole recipe, including the closed details, and follow "Install
by hand" first. The walkthrough before it is for the owner afterwards. Do
not run the AI bot, Restore or Update instructions during setup.
Work as exedev in ~/chatwoot. Never overwrite an existing ~/chatwoot/.env:
it holds the encryption keys. Do not create the Chatwoot admin account,
inboxes or agents; the owner does that in the browser. Leave sharing
alone: don't run share set-public or share receive-email.
Verify docker.service is enabled and every container is running with
restart unless-stopped; localhost:3000/api reports version 4.20.0;
localhost:8000/packs/js/sdk.js and /health return 200 while
localhost:8000/app/login and /super_admin redirect to port 3000. Check
the Captain settings point at https://llm.int.exe.xyz and the gateway
answers from the rails container. Check the backup timer is enabled,
then restore the first backup only in the scratch directory and remove it.
Finish with the dashboard URL on port 3000, tell the owner to sign up
there with their exe.dev email address, and give these OPTIONAL commands
for their own computer: ssh exe.dev share receive-email my-chatwoot on
(email inbox) and ssh exe.dev share set-public my-chatwoot (widget on a
public website).

Finish with the URLs I should open.
Also at /deploy/chatwoot/prompt.txt. The recipe it follows is /deploy/chatwoot.md.
Sign in#
When Shelley finishes, open https://my-chatwoot.exe.xyz:3000/. After
exe.dev login, Chatwoot asks you to create its first account:
- Enter your name, company name, the email you use for exe.dev, and a password. exe.dev only delivers the VM's email to you, your team and people you share it with, so that's an address Chatwoot can reach.
- Answer Chatwoot's short questionnaire (role, website, time zone) and you're in the inbox.
This first user is also Chatwoot's super admin, with an extra console at
/super_admin. Turn on two-factor authentication in your profile
settings. Sign-up is closed: new people join only by invitation.
Put a chat bubble on a page#
In the dashboard, go to Settings → Inboxes → Add Inbox → Website.
Give it a name and your website's address, add yourself as an agent, and
Chatwoot shows a script to paste into your site. The websiteToken in it
identifies this inbox.
Try it before touching your site. Shelley set up a test page; open it with your token at the end:
https://my-chatwoot.exe.xyz/try/?token=YOUR_WEBSITE_TOKEN
Click the bubble, send a message, and it pops up in the dashboard. Reply there and the answer appears in the bubble straight away. This works while the VM is private because you're signed in to exe.dev.
Your visitors aren't, so to put the bubble on your real website, make the VM's main address public. On your computer:
ssh exe.dev share set-public my-chatwoot
Then paste Chatwoot's script into your site. The public address answers
only the widget, Chatwoot's public APIs, help center pages and channel
webhooks; everything else, including the sign-in page, redirects to the
private dashboard on port 3000. To close it again:
ssh exe.dev share set-private my-chatwoot.
Answer email#
exe.dev can receive mail for any address at your VM's name and hand it to Chatwoot. On your computer, turn that on:
ssh exe.dev share receive-email my-chatwoot on
In the dashboard, go to Settings → Inboxes → Add Inbox → Email,
pick Other Providers, and enter a name and an address such as
support@my-chatwoot.exe.xyz. Mail to that address becomes a
conversation in the new inbox. Your replies go out through exe.dev's
email gateway, in the customer's thread.
exe.dev's email is meant for a VM's own business, so it has limits:
- Replies reach people who wrote to the VM, within their thread, for 30
days. Chatwoot can't start a new email to a customer, or email website
visitors who left an address in the widget, unless that person once
sends the VM an email with the subject
subscribe. - Mail goes out as plain text with a short exe.dev footer.
- Incoming mail is capped at 1 MB and isn't spam-filtered.
- Only
@my-chatwoot.exe.xyzaddresses, no custom domains.
For support@yourcompany.com, add an Email inbox that connects to your
mail provider with IMAP and SMTP instead (in the inbox's settings);
Chatwoot then reads and sends that mailbox's mail itself, with none of
these limits.
Chatwoot's own email (invitations, password resets, "new conversation" notifications) goes to your agents through the same gateway, which works because agents are people you share the VM with.
Bring your team#
Each agent needs two things: exe.dev access to open the dashboard, and a Chatwoot invitation. On your computer:
ssh exe.dev share add my-chatwoot alice@example.com
Alice gets an exe.dev invitation. Once she has opened
https://my-chatwoot.exe.xyz:3000/ and signed in to exe.dev, the VM may
email her, so add her in Chatwoot: Settings → Agents → Add Agent with
the same address. She sets her Chatwoot password from the invitation
email. To remove someone, delete them in both places.
Write replies with AI#
Shelley pointed Chatwoot's AI features ("Captain") at exe.dev's LLM gateway, so they work without a key. In any conversation, click the ✨ button above the reply box:
- Suggest a reply drafts an answer from the conversation so far.
- Summarize the conversation writes what the customer wants and what's still to do; handy before you pick up someone else's thread.
- Type a reply, then use ✨ to make it more friendly, formal, shorter or clearer, or to fix the grammar.
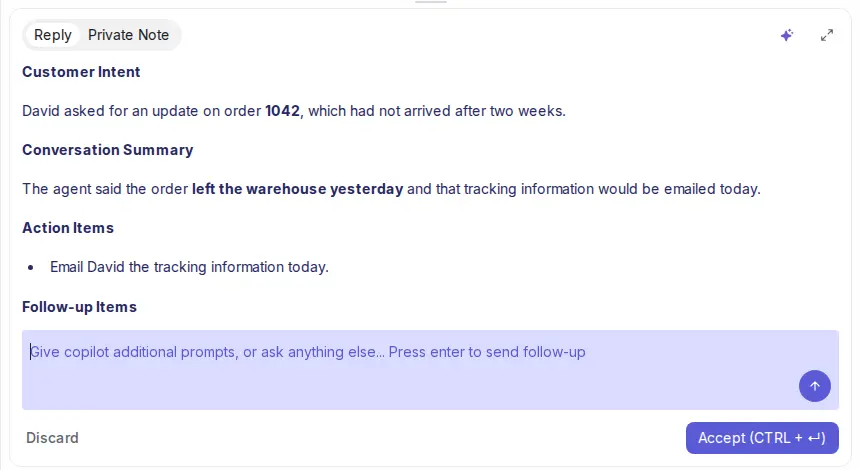
Nothing is sent until you press Send. Usage is billed through your
exe.dev LLM integration. The model is gpt-6-luna; change it under
/super_admin → Settings → Captain.
Let a bot answer first#
Chatwoot's Captain agent, which answers customers on its own, is part of the paid edition. A small bot does the simple version: it answers website visitors from a page of instructions you write, and hands the conversation to your team when it can't help or someone asks for a person.
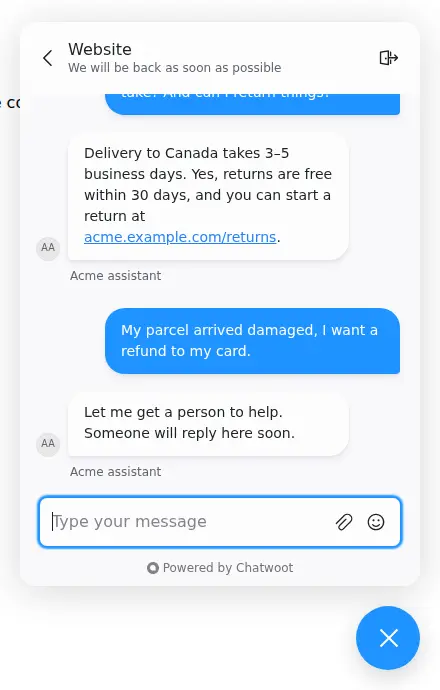
The easy way: tell Shelley what your business is and ask it to set up the AI bot from this page for your Website inbox. To do it yourself, see Add the AI bot below.
Connect your apps#
Chatwoot's API from your servers. The dashboard's API is on the private port, so a script needs two keys: a VM token for exe.dev, and the Access Token from your Chatwoot profile settings. On your computer, make the VM token:
ssh exe.dev ssh-key generate-api-key --vm=my-chatwoot --label=support-scripts --exp=1y
Then, from the script's machine:
curl -s https://my-chatwoot.exe.xyz:3000/api/v1/accounts/1/conversations \
  -H "X-Exedev-Authorization: Bearer $EXE_VM_TOKEN" \
  -H "api_access_token: $CHATWOOT_TOKEN"
exe.dev checks and strips the first header; Chatwoot checks the second.
Without the VM token you get exe.dev's 401.
Your own app as a channel. An API inbox (Settings → Inboxes → Add Inbox → API) gives your mobile app or backend a public client API on the main address, for creating contacts, conversations and messages:
B=https://my-chatwoot.exe.xyz/public/api/v1/inboxes/YOUR_INBOX_IDENTIFIER
curl -s -X POST $B/contacts -H 'Content-Type: application/json' -d '{"name":"Grace"}'
# {"source_id":"120e126e-...", ...}
Use the source_id to post to $B/contacts/SOURCE_ID/conversations
and then to that conversation's messages. While the VM is private, add
the X-Exedev-Authorization header here too.
Automation. Chatwoot's webhooks and the n8n Chatwoot node can tag, route and summarize conversations. Ask Shelley for anything that needs code on the VM.
Keep your conversations#
Backups run nightly into ~/chatwoot-backups and keep 14 days. Keep a
copy off the VM too. On your computer:
scp -r my-chatwoot.exe.xyz:chatwoot-backups .
Each backup holds the database, uploaded files, and .env with the
encryption keys, so keep them private. Don't replace ~/chatwoot/.env:
without its keys, two-factor and channel secrets can't be decrypted.
The nuts and bolts#
These are Shelley's setup steps and your maintenance reference. Tested with Chatwoot 4.20.0, PostgreSQL 16 (pgvector), Redis 8 and nginx 1.30 on November 18, 2026, including a reboot and a restore.
Install by hand
Create a VM#
On your computer (pick another name if my-chatwoot is taken):
ssh exe.dev new --name=my-chatwoot
ssh my-chatwoot.exe.xyz
The remaining commands run on the VM, as exedev.
Write the settings#
Chatwoot's address, its secrets, and the mail settings. The file is created only once, so running this again keeps your keys:
sudo systemctl enable --now docker.service
mkdir -p ~/chatwoot/postgres ~/chatwoot/redis ~/chatwoot/storage ~/chatwoot/try
mkdir -p ~/Maildir/new ~/Maildir/cur ~/Maildir/tmp
cd ~/chatwoot
if [ ! -f .env ]; then
  (umask 077; cat > .env <<EOF
# Chatwoot's settings and secrets. Back this file up: the encryption
# keys protect two-factor secrets and channel credentials.
CHATWOOT_VERSION=v4.20.0
FRONTEND_URL=https://$(hostname).exe.xyz
SECRET_KEY_BASE=$(openssl rand -hex 64)
ACTIVE_RECORD_ENCRYPTION_PRIMARY_KEY=$(openssl rand -hex 16)
ACTIVE_RECORD_ENCRYPTION_DETERMINISTIC_KEY=$(openssl rand -hex 16)
ACTIVE_RECORD_ENCRYPTION_KEY_DERIVATION_SALT=$(openssl rand -hex 16)
POSTGRES_HOST=postgres
POSTGRES_USERNAME=postgres
POSTGRES_PASSWORD=$(openssl rand -hex 24)
REDIS_URL=redis://redis:6379
REDIS_PASSWORD=$(openssl rand -hex 24)
RAILS_ENV=production
NODE_ENV=production
INSTALLATION_ENV=docker
RAILS_LOG_TO_STDOUT=true
ENABLE_ACCOUNT_SIGNUP=false
ACTIVE_STORAGE_SERVICE=local
# Mail out through smtp-relay to exe.dev's gateway, mail in from ~/Maildir.
SMTP_ADDRESS=smtp-relay
SMTP_PORT=2525
SMTP_DOMAIN=$(hostname).exe.xyz
SMTP_ENABLE_STARTTLS_AUTO=false
MAILER_SENDER_EMAIL=Chatwoot <chatwoot@$(hostname).exe.xyz>
MAILER_INBOUND_EMAIL_DOMAIN=$(hostname).exe.xyz
RAILS_INBOUND_EMAIL_SERVICE=relay
RAILS_INBOUND_EMAIL_PASSWORD=$(openssl rand -hex 24)
EOF
  )
fi
ls -l .env
ls shows -rw-------. Enabling docker.service brings the containers
back after a reboot. FRONTEND_URL is the VM's main address: Chatwoot
puts it in the widget script, email links and channel webhooks.
ENABLE_ACCOUNT_SIGNUP=false means nobody can sign up uninvited.
Get the helpers#
Three small files run beside Chatwoot:
- smtp-relay.py accepts Chatwoot's SMTP inside Compose and hands each message to exe.dev's email gateway, keeping the reply thread.
- mail-to-chatwoot.py
watches
~/Maildir/new, where exe.dev delivers the VM's mail, and posts each message to Chatwoot's inbound email endpoint. - try.html is the widget test page.
cd ~/chatwoot
curl -fsSL -o smtp-relay.py https://exe-staging.dev/deploy/chatwoot/smtp-relay.py
curl -fsSL -o mail-to-chatwoot.py https://exe-staging.dev/deploy/chatwoot/mail-to-chatwoot.py
curl -fsSL -o try/index.html https://exe-staging.dev/deploy/chatwoot/try.html
Write the Compose file#
Chatwoot's official Compose setup (Rails, Sidekiq, PostgreSQL with pgvector, Redis), plus the public proxy and the two mail helpers:
cd ~/chatwoot
cat > compose.yaml <<'EOF'
# Chatwoot: Rails (dashboard, widget, APIs) and Sidekiq (background jobs),
# PostgreSQL with pgvector, Redis, nginx for the public port, and mail
# bridges to exe.dev. Settings and secrets come from .env.
name: chatwoot

x-chatwoot: &chatwoot
  image: chatwoot/chatwoot:${CHATWOOT_VERSION}
  env_file: .env
  restart: unless-stopped
  volumes:
    - ./storage:/app/storage
  depends_on:
    postgres:
      condition: service_healthy
    redis:
      condition: service_started

services:
  rails:
    <<: *chatwoot
    entrypoint: docker/entrypoints/rails.sh
    command: ["bundle", "exec", "rails", "s", "-p", "3000", "-b", "0.0.0.0"]
    ports:
      - "3000:3000"

  sidekiq:
    <<: *chatwoot
    command: ["bundle", "exec", "sidekiq", "-C", "config/sidekiq.yml"]

  postgres:
    image: pgvector/pgvector:pg16
    restart: unless-stopped
    environment:
      POSTGRES_USER: postgres
      POSTGRES_PASSWORD: ${POSTGRES_PASSWORD}
      POSTGRES_DB: chatwoot_production
    volumes:
      - ./postgres:/var/lib/postgresql/data
    healthcheck:
      test: ["CMD-SHELL", "pg_isready -U postgres"]
      interval: 5s
      timeout: 5s
      retries: 10

  redis:
    image: redis:8-alpine
    restart: unless-stopped
    command: ["sh", "-c", "redis-server --appendonly yes --requirepass \"$$REDIS_PASSWORD\""]
    env_file: .env
    volumes:
      - ./redis:/data

  public:
    image: nginx:1.30-alpine
    restart: unless-stopped
    ports:
      - "8000:80"
    volumes:
      - ./nginx.conf:/etc/nginx/conf.d/default.conf:ro
      - ./try:/usr/share/nginx/try:ro
    depends_on:
      - rails

  smtp-relay:
    image: python:3.13-alpine
    restart: unless-stopped
    command: ["python3", "-u", "/smtp-relay.py"]
    environment:
      SMTP_RELAY_LISTEN: 0.0.0.0
    volumes:
      - ./smtp-relay.py:/smtp-relay.py:ro

  mail-in:
    image: python:3.13-alpine
    restart: unless-stopped
    command: ["python3", "-u", "/mail-to-chatwoot.py"]
    environment:
      RAILS_INBOUND_EMAIL_PASSWORD: ${RAILS_INBOUND_EMAIL_PASSWORD}
    volumes:
      - ./mail-to-chatwoot.py:/mail-to-chatwoot.py:ro
      - ${HOME}/Maildir:/maildir
EOF
docker compose config --quiet && echo compose ok
Only rails (3000) and public (8000) have ports; the rest talk inside
Compose.
Keep the dashboard off the public port#
exe.dev can make one port public: 8000, the VM's main address. This nginx configuration serves only what visitors and other services need there and sends everything else to the private port 3000:
cd ~/chatwoot
cat > nginx.conf <<'EOF'
# Port 8000 is the port exe.dev can make public. Serve what website
# visitors and other services need (the chat widget, public APIs, help
# center, channel webhooks) and send everything else, the dashboard
# included, to the private port 3000.
map $http_upgrade $connection_upgrade {
    default upgrade;
    ''      close;
}

server {
    listen 80 default_server;
    server_tokens off;

    resolver 127.0.0.11 valid=10s ipv6=off;
    set $chatwoot http://rails:3000;

    client_max_body_size 40m;
    proxy_http_version 1.1;
    proxy_read_timeout 300s;
    proxy_set_header Host $host;
    proxy_set_header Upgrade $http_upgrade;
    proxy_set_header Connection $connection_upgrade;
    proxy_set_header X-Forwarded-For $http_x_forwarded_for;
    proxy_set_header X-Forwarded-Host $http_x_forwarded_host;
    proxy_set_header X-Forwarded-Proto $http_x_forwarded_proto;

    location ~ ^/(widget$|api/v1/widget/|public/api/v1/|cable$|packs/|vite/|assets/|brand-assets/|audio/|hc/|survey/responses/|rails/active_storage/|webhooks/|health$|robots\.txt$|favicon) {
        # Check the raw path too, so encoded tricks such as
        # /hc/..%2Fapp can't reach anything else.
        if ($request_uri !~ ^/(widget$|widget\?|api/v1/widget/|public/api/v1/|cable$|cable\?|packs/|vite/|assets/|brand-assets/|audio/|hc/|survey/responses/|rails/active_storage/|webhooks/|health$|robots\.txt$|favicon)) {
            return 404;
        }
        proxy_pass $chatwoot;
    }

    # The widget test page.
    location /try/ {
        alias /usr/share/nginx/try/;
    }

    location / {
        return 302 https://$host:3000$request_uri;
    }
}
EOF
/cable is the WebSocket that carries live replies to the widget; the
dashboard uses its own on port 3000. Both pass through exe.dev's proxy
unchanged.
Start Chatwoot#
Prepare the database, then start everything. The first pull is about 1.5 GB and takes a few minutes:
cd ~/chatwoot
docker compose pull -q
docker compose up -d postgres redis
docker compose run --rm rails bundle exec rails db:chatwoot_prepare 2>&1 | tail -n 3
docker compose up -d
until curl -fs http://localhost:3000/api; do sleep 5; done; echo
Expect {"version":"4.20.0",...,"queue_services":"ok","data_services":"ok",...}.
Check that the public port serves the widget and nothing private:
for p in /packs/js/sdk.js /health /try/ /app/login /super_admin /api/v1/profile; do
  printf '%-18s %s\n' "$p" "$(curl -s -o /dev/null -w '%{http_code}' http://localhost:8000$p)"
done
The first three answer 200; the rest 302 (to port 3000).
Connect the AI features#
Point Chatwoot's Captain settings at exe.dev's LLM gateway. Chatwoot wants a key, but the gateway ignores it, so any text will do:
cd ~/chatwoot
docker compose exec -T rails bundle exec rails runner '
  { "CAPTAIN_OPEN_AI_API_KEY" => "exe-llm-gateway",
    "CAPTAIN_OPEN_AI_ENDPOINT" => "https://llm.int.exe.xyz" }.each do |name, value|
    config = InstallationConfig.find_or_initialize_by(name: name)
    config.value = value
    config.save!
  end
  puts "Captain endpoint: " + InstallationConfig.find_by(name: "CAPTAIN_OPEN_AI_ENDPOINT").value' 2>/dev/null
docker compose exec -T rails wget -qO- https://llm.int.exe.xyz/v1/models | head -c 80; echo
Expect Captain endpoint: https://llm.int.exe.xyz and the start of a
model list.
Set up nightly backups#
This script saves the database, uploaded files, .env and the
configuration in one private archive, and keeps the 14 newest:
cat > ~/chatwoot/backup.sh <<'EOF'
#!/usr/bin/env bash
# Back up Chatwoot into one tarball: a PostgreSQL dump, the uploaded
# files (storage/), .env with its secrets, and the configuration.
set -euo pipefail
umask 077
cd "$(dirname "$0")"
dest="$HOME/chatwoot-backups"
mkdir -p "$dest"
work=$(mktemp -d "$dest/.tmp-XXXXXX")
trap 'rm -rf "$work"' EXIT

docker compose exec -T postgres pg_dump -U postgres -d chatwoot_production --format=custom > "$work/chatwoot.dump"
cp -a .env compose.yaml nginx.conf backup.sh smtp-relay.py mail-to-chatwoot.py try storage "$work/"
[ -d bot ] && cp -a bot "$work/"

out="$dest/chatwoot-$(date -u +%Y%m%d-%H%M%S).tar.gz"
tar -czf "$out.part" -C "$work" .
mv "$out.part" "$out"

# Keep the 14 newest backups.
ls -1t "$dest"/chatwoot-*.tar.gz | tail -n +15 | xargs -r rm --
echo "$out"
EOF
chmod +x ~/chatwoot/backup.sh
Schedule it, then take a first backup:
sudo tee /etc/systemd/system/chatwoot-backup.service >/dev/null <<EOF
[Unit]
Description=Back up Chatwoot (database, files, .env) to ~/chatwoot-backups
Requires=docker.service
After=docker.service

[Service]
Type=oneshot
User=$USER
ExecStart=$HOME/chatwoot/backup.sh
EOF
sudo tee /etc/systemd/system/chatwoot-backup.timer >/dev/null <<'EOF'
[Unit]
Description=Back up Chatwoot every night

[Timer]
OnCalendar=*-*-* 03:30:00
RandomizedDelaySec=30m
Persistent=true

[Install]
WantedBy=timers.target
EOF
sudo systemctl daemon-reload
sudo systemctl enable --now chatwoot-backup.timer
sudo systemctl start chatwoot-backup.service
systemctl list-timers chatwoot-backup.timer --no-pager
ls -lh ~/chatwoot-backups
The timer shows a next run and the directory holds a tarball. For
failures: journalctl -u chatwoot-backup.service.
Test a backup#
Restore the newest backup into a scratch stack, not the running one:
latest=$(ls -1t ~/chatwoot-backups/chatwoot-*.tar.gz | head -n 1)
mkdir -p /tmp/chatwoot-restore-test/postgres
tar -xzf "$latest" -C /tmp/chatwoot-restore-test
cd /tmp/chatwoot-restore-test
docker compose -p chatwoot-restore-test up -d --wait postgres
docker compose -p chatwoot-restore-test exec -T postgres pg_restore -U postgres -d chatwoot_production --no-owner --exit-on-error < chatwoot.dump
docker compose -p chatwoot-restore-test exec -T postgres psql -U postgres -d chatwoot_production -tAc \
  "select 'installation configs: ' || count(*) from installation_configs union all select 'conversations: ' || count(*) from conversations"
Expect over a hundred installation configs, and your conversations once there are some. Remove only this scratch copy afterwards:
cd /tmp/chatwoot-restore-test && docker compose -p chatwoot-restore-test down
cd ~ && sudo rm -rf /tmp/chatwoot-restore-test
Installation done. Leave the admin account, inboxes and sharing to the owner; continue with Sign in.
Add the AI bot
bot.py is a Chatwoot agent bot: Chatwoot posts each new message to it, and it answers through exe.dev's LLM gateway while the conversation is still pending (the bot's). When it can't answer from your instructions, or the customer asks for a person, it says so and marks the conversation open for your team. It remembers each conversation in memory, so a restart only forgets the context of chats in progress.
On the VM, fetch the bot and write its instructions (yours, not Acme's):
mkdir -p ~/chatwoot/bot && cd ~/chatwoot/bot
curl -fsSL -o bot.py https://exe-staging.dev/deploy/chatwoot/bot.py
cat > instructions.md <<'EOF'
You answer questions on the support chat of Acme, a small online shop.
- We ship to the US, Canada, and the EU. Delivery takes 3-5 business days.
- Returns are free within 30 days; customers start one at acme.example.com/returns.
- Opening hours for human support: Monday to Friday, 9:00-17:00 UTC.
EOF
In the dashboard, go to Settings → Bots → Add Bot: name it (visitors
see the name), set the webhook URL to http://bot.internal:5005/, and
click Create Bot. Chatwoot shows the bot's access token and
webhook secret; copy both. Then under Settings → Inboxes → your
website inbox → Bot Configuration, pick the bot and click Update.
On the VM, add both to .env (replace the placeholders), let Chatwoot
call a bot inside Compose, and add the bot's container:
cd ~/chatwoot
cat >> .env <<'EOF'
CHATWOOT_BOT_TOKEN=paste-the-access-token
CHATWOOT_BOT_SECRET=paste-the-webhook-secret
# Let Chatwoot deliver webhooks to the bot container's private address.
SAFE_FETCH_ALLOW_PRIVATE_NETWORK=true
EOF
nano .env
cat >> compose.yaml <<'EOF'

  bot:
    image: python:3.13-alpine
    restart: unless-stopped
    command: ["python3", "-u", "/bot/bot.py"]
    environment:
      CHATWOOT_BOT_TOKEN: ${CHATWOOT_BOT_TOKEN}
      CHATWOOT_BOT_SECRET: ${CHATWOOT_BOT_SECRET}
      LLM_MODEL: gpt-5.4-mini
    volumes:
      - ./bot:/bot:ro
    networks:
      default:
        # Chatwoot's bot form wants a host name with a dot in it.
        aliases: [bot.internal]
EOF
docker compose up -d
docker compose logs bot
The log says chatwoot bot on :5005. Ask a question on the
test page: the bot answers within a few
seconds and the conversation waits under Pending in the dashboard;
ask for a person and it moves to Open. Edit bot/instructions.md any
time; the bot rereads it for every answer. SAFE_FETCH_ALLOW_PRIVATE_NETWORK
also lets Chatwoot's webhooks and API inboxes call private addresses, so
only admins should be able to set those up.
Back up and restore
On the VM, ~/chatwoot/backup.sh makes an extra backup and prints its
path. Each archive has the database, uploads and encryption keys;
restore them together.
Restore#
Make a new VM as in Create a VM (or use the old one), then copy your backup over. On your computer:
scp chatwoot-20261118-033012.tar.gz my-chatwoot.exe.xyz:
Use your backup's actual filename here and below. The rest runs on the VM. If Chatwoot already runs there, stop it and keep its directory aside first:
cd ~/chatwoot && docker compose down
mv ~/chatwoot ~/chatwoot.before-restore
Unpack the backup, set this VM's address, and load the database before starting Chatwoot:
sudo systemctl enable --now docker.service
mkdir -p ~/chatwoot/postgres ~/chatwoot/redis ~/Maildir/new ~/Maildir/cur ~/Maildir/tmp
tar -xzf ~/chatwoot-20261118-033012.tar.gz -C ~/chatwoot
cd ~/chatwoot
sed -i "s/[a-z0-9-]*\.exe\.xyz/$(hostname).exe.xyz/" .env
docker compose up -d --wait postgres
docker compose exec -T postgres pg_restore -U postgres -d chatwoot_production --no-owner --exit-on-error < chatwoot.dump
docker compose up -d
until curl -fs http://localhost:3000/api; do sleep 5; done; echo
Sign in on port 3000 and check your conversations. On a new VM, also
recreate the backup timer, turn email and public sharing back on if you
used them, and update the widget script on your website if the VM's name
changed. Keep ~/chatwoot.before-restore until you're happy.
Update Chatwoot
Pick a version from Chatwoot's
releases and read its
notes. On the VM, back up, set only CHATWOOT_VERSION in .env (put
your version in place of v4.20.0), then pull, migrate and restart:
cd ~/chatwoot
./backup.sh
sed -i 's/^CHATWOOT_VERSION=.*/CHATWOOT_VERSION=v4.20.0/' .env
docker compose pull rails sidekiq
docker compose run --rm rails bundle exec rails db:chatwoot_prepare 2>&1 | tail -n 3
docker compose up -d
until curl -fs http://localhost:3000/api; do sleep 5; done; echo
The reported version is the new one. To roll back, restore the backup: an older image won't undo database migrations.
Something not working?
On the VM:
cd ~/chatwoot
docker compose ps
docker compose logs --tail=100 rails sidekiq
- The main URL redirects to port 3000: expected for anything but the
widget and public APIs. Open the dashboard at
https://my-chatwoot.exe.xyz:3000/. - The widget doesn't load on your website: the VM must be public
(
ssh exe.dev share set-public my-chatwoot), and the script'sBASE_URLmust behttps://my-chatwoot.exe.xyzwithout:3000. - Email doesn't arrive: check
ssh exe.dev share receive-email my-chatwootsays on, anddocker compose logs mail-in. Mail Chatwoot refused lands in~/Maildir/failed; Chatwoot accepts mail only for an Email inbox's address. - A reply email isn't delivered:
docker compose logs smtp-relayshows exe.dev's reason. The gateway sends only to the people listed under Answer email. - ✨ AI features fail:
docker compose logs rails | grep -i captain, and rerun Connect the AI features. - The bot stays silent:
docker compose logs bot sidekiq. Check the bot is chosen in the inbox's Bot Configuration and that.envhasSAFE_FETCH_ALLOW_PRIVATE_NETWORK=true(thendocker compose up -d). - Down after a reboot:
sudo systemctl enable --now docker.service. ~/Maildirowned by root: Docker created it before you did;sudo chown -R exedev:exedev ~/Maildir.
Frequently asked questions#
Is self-hosted Chatwoot free?
The Community Edition is MIT-licensed and free, with no limit on agents or conversations. You pay for the VM; in our test the whole stack used about 600 MB of memory, which fits the smallest exe.dev plan. Chatwoot's paid self-hosted plans add features such as the Captain AI agent, SLAs and audit logs.
Does the AI work without an OpenAI key?
Yes. Chatwoot's AI reply tools (suggest a reply, summarize, rewrite) call exe.dev's LLM gateway, which needs no key on the VM. The autonomous Captain agent that answers customers from your docs is a paid feature; this page includes a small AI bot you can run instead.
Can customers email support@ my own domain?
Not through exe.dev's email: it receives mail only for addresses at your VM's name. Add an Email inbox in Chatwoot that signs in to your own mail provider with IMAP and SMTP, and Chatwoot reads and sends that mailbox's mail itself.
Can I keep the chat widget private?
For testing, yes: while the VM is private the widget works for anyone signed in to exe.dev with access to it. Your website's visitors can't sign in, so the widget needs the VM's main address public. That address serves only the widget, public APIs and webhooks; the dashboard stays private on port 3000.
Which other channels work?
Anything Chatwoot connects to over the internet: Telegram, WhatsApp, Facebook, Instagram, SMS providers and so on. They call Chatwoot's /webhooks/ addresses, so make the VM public first, and give Chatwoot the channel's own token. We tested the website, email and API channels.
Can I use my own domain for the widget?
Yes. Ask Shelley to connect a custom domain to the VM's main address and change FRONTEND_URL in ~/chatwoot/.env to match. The dashboard can stay at its exe.xyz address on port 3000.
Updated Nov 18, 2026 · tested end to end Nov 18, 2026 · Markdown · manifest.json · Something wrong? Tell us